Just as promised: here's my little "How to make a Christmas stocking" tutorial. I made a very plain stocking, the basic version or so you might say. Of course you can add further decoration or accessories :) Instead of a long speech I want to show you the pictures I took while sewing.
Christmas Stocking Tutorial
What you will need:
- sweets! Lots of. And maybe some healthy stuff ;) Your stocking has to be filled afterwards
- fabrics (I recommend using felt. It's very easy to sew plus you don't need to cast the edges, because it does not fray. But you can also use jute or something similar)
- scissors
- fixing pins
- needle and thread
- glue (better use the white adhesive for handicraft work. It will become transparent when dried. Other glue might leave stains on the fabric)
- pencil or marker
- decoration
Draw the shape of a stocking unto the fabric. I used red felt. You can get felt (and jute) in every fabric shop as cut goods and sometimes in craft shops in form of a small sheet. I bought my felt in a local craft shop for 0,40 EUR a sheet.
Try to use as much space of your sheet/fabric as possible. Note: when you sew them together and turn it over afterwards the capacity of the stocking will shrink.
Fix the one side of the cut stocking with pins on the fabric and cut the second part.
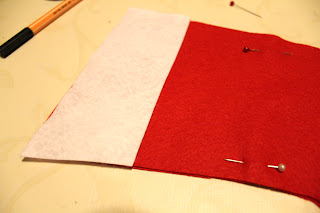
Now we need the typical white edge of the stocking. Put the red felt part on the white fabric (you can also use fake fur to make the stocking extra fluffy) and mark the edges. You will need two white trimmings - one for each side of the stocking.
Glue or sew the trimming onto the outside of your stocking. As recommended earlier use handicraft adhesive to prevent stains on material.
If you want to hang your stocking apply a pull strap. Just sew it in the back of your stocking.
Once you applied both trimmings, put both sides on top of each other. Make sure the trimming is inside, this is very important. Otherwise you will have the wrong side on the outside.
Fix both sides with pins and sew them together. I used my sewing machine, because I am a bit lazy. Sewing by hand is also okay, it will just need a little bit more time. Leave a span of roundabout 0.5-1.0 centimeters to make sure you sew both sides. Of course this span can be shorter, if you worked more careful beforehand.
Afterwards cut back the seam allowance and turn the inside out. Then iron your stocking.
After you are finished with ironing your stocking is supposed to look like this. Now it is time to apply all the decoration! Better put a paperboard inside, if you want to glue. This way the stocking can't stick together by accident ;)
Et voilà: your Christmas stocking is finished! Now fill it with the stuff you like the most.
In case you made your stocking bigger, you can use it as a cute packing for Christmas presents, too. A good book, jewelry or a perfume might fit inside as well ;)
I hope this tutorial was useful for you. How do you like it? Was it easy to understand? Or maybe it motivated you to make a Christmas stocking yourself? Please give me feedback so I can improve.
I wish you a happy and pleasant St Nicholas' Day! <3
Love,
J.


Keine Kommentare:
Kommentar veröffentlichen